


Back in July, the kids and I checked out the Minecraft Experience: Villager Rescue.
Working in child care, I knew this would be a popular event. With the release of the Minecraft movie this year, the game has made a comeback. In fact, starting about a month before the movie’s release, it was all the kids I work with could talk about—and now, even with the new school year underway, they’re still obsessed.
If you plan to visit with an autistic child, check out my upcoming post on how autism friendly the Minecraft Experience is on my sister site AutismOnVacation.com.
In this post, I’ll share our full Minecraft Experience: Villager Rescue review, along with some details you’ll want to know before you go.
Minecraft Experience: Villager Rescue Info
What is the Minecraft Experience: Villager Rescue?
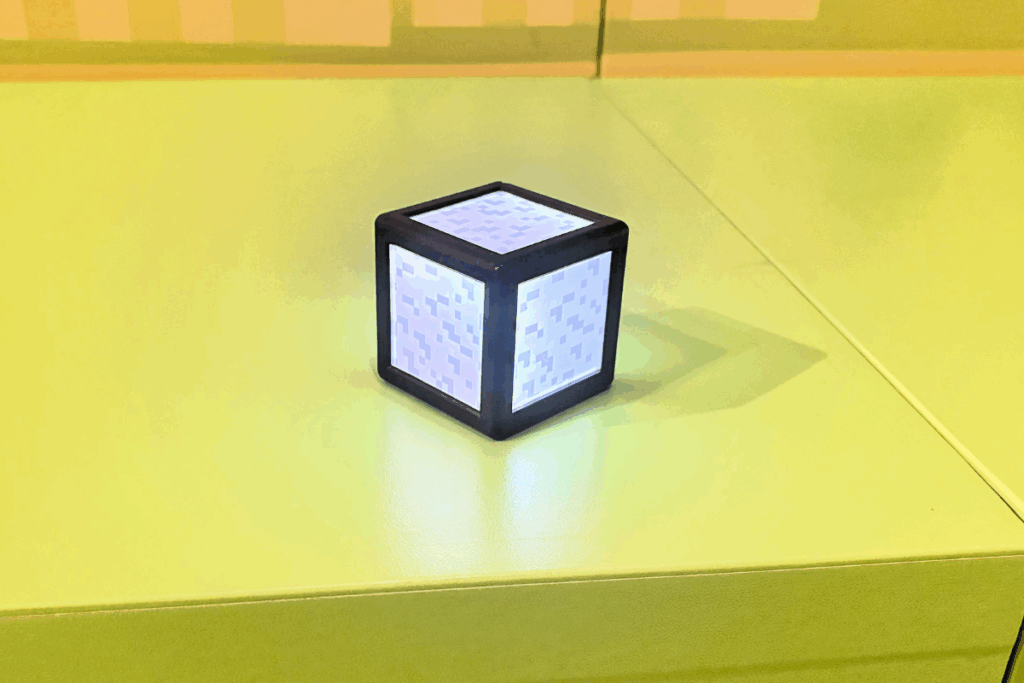
The Minecraft Experience is an immersive, interactive experience that places you right inside a Minecraft world. Each player receives a Minecraft experience Orb of Interaction (a cube, of course—it’s Minecraft), which lights up and changes colors as it interacts with different objects. You use the Orb to complete tasks such as chopping down trees, mining, and battling Creepers, Ghasts, and more. You’ll also find objects (like apples) on the ground that you can collect by stepping on them.
Minecraft Experience: Villager Rescue Location and Parking
The Minecraft Experience is a traveling event, so its location changes. Right now, it’s in London, UK and Mississauga, Ontario, Canada. More Minecraft Experience locations are expected, but the next stop has not yet been announced.
The Mississauga location is currently scheduled to close in mid-September, although the end date has already been extended once and may change again.
We visited the Toronto-area location, which is at Square One in Mississauga (199 Rathburn Rd W). Finding it was a little confusing. The website lists it as being at the Square One Shopping Centre, so I assumed it was in the mall. It’s not—it’s in a separate building about a block away.
Parking at Square One is free. If you’re only visiting the Minecraft Experience, there’s a lot directly in front of the building. Since we also planned to go back to the Rec Room afterwards, we stayed parked at the mall and walked over. That took about 10 minutes.
Minecraft Experience: Villager Rescue Tickets
You can buy Minecraft Experience tickets online through their official website, or at the door (though online purchase is recommended to guarantee your time slot).
This is a timed event, with tickets sold in 15-minute intervals. If you’re late, you may be allowed into a later group if there’s space, but it’s not guaranteed.
Ticket prices range from $35–$50 per person, depending on the date and time. Discounts are available for groups of 3–10 or 11+. Every guest, including parents, needs a ticket—except for children under 2.
Refunds are not available. Their website does state that you can reschedule your date or time with more than 48 hours’ notice. But BBB complaints about other events by the same organizer (Fever), show that many guests have reported difficulties making changes through customer service.
How long does the Minecraft Experience Last?
The experience runs for about 55 minutes.
Minecraft Experience: Villager Rescue Tips & FYIs
- This is a guided experience, so you don’t get to spend as much time as you want in each room. You move with the group you start with until the end.
- Each time slot has room for up to 25 participants.
- Looking for a kid-free option? Try adult nights on Wednesdays and Thursdays. These include a Minecraft-themed mocktail (with a cocktail upgrade available), trivia, and a scavenger hunt.
- Bathrooms are available inside the venue, but not throughout the experience, so you’ll want to use them before your time slot starts. If you leave mid-way, you can rejoin, but you’ll have to track down your group and may miss part of the storyline and experience.
- Food and drinks aren’t allowed inside. Snacks and drinks aren’t sold on-site either, but the mall is just a short walk away and has plenty of options.
- The event is wheelchair accessible, but strollers are not allowed. Non-walkers will need to be carried or worn.
- This is a cashless event (including the gift shop).
- Currently, there is a promotion for a free in-game Minecraft Experience cape code with each ticket purchased. You can redeem one code per Microsoft account, and extras can be gifted to other players.
What do you do at the Minecraft Experience?
Your Minecraft Experience begins when you check in and receive your Minecraft Experience Orb of Interaction. This light-up cube is your tool to engage with both physical objects and objects projected onto the walls and floors. Whenever you see an X symbol on the ground, stand on it and shake your orb to interact with the objects on the screen.
The orb changes colors throughout the experience (like turning blue when you collect water) and turns green and vibrates when it’s time to move on to the next room.
Before entering the first room, you wait outside to watch a short video narrated by Dayo and Tobin, your cartoon guides for the adventure. They explain the basics of the experience. Once the video ends, a staff member leads your group into the first room.
Spawn Into the Forest & Practice Your Skills
The first room is the forest, featuring two large interactive forest screens on one wall. Green X squares on the ground indicate where to stand as you use your orb to cut down trees and defend against Creepers, Spiders, and Skeletons.
This room is filled with physical scenery and objects, including pigs, an Iron Golem, a chicken, a Creeper, Minecraft trees, and wood block benches. It’s the best area for pictures, so take a break to get some Minecraft Experience photos before moving on, as you cannot return once you leave.
The forest room is also the most crowded, as two groups share it simultaneously. But, this does at least give you extra time to get familiar with using the orb and enjoy the scenery.
Craft Tools and Weapons
Next, you enter a smaller room focused on making your weapons.
Gather resources from four spots around the room: sticks, cobblestone, oak planks, and iron ingots. Each resource has a glowing block with three spots to place your orb. Once the material is collected, your orb changes to the block’s color.
Take your orb over to the screen wall that has weapons with square grids under them. Infront of the screen there is a block for each weapon with a grid to place your Orb on that matches the screen. Match your collected resources to the correct spots on the grid to craft your weapons. When complete, the screen shows the weapons being placed in a chest and tallies how many your group created.
Build A Thriving Village
In this room, the storyline begins, revealing your mission.
A large table features multiple interactive screens. Use your orb by placing it on or moving around the screen to build a village and collect hearts on the screen. Eventually, zombies attack the villagers, and your mission becomes finding ingredients to cure them: a Splash Potion of Weakness and a Golden Apple.
The instructions then explain your mission to go to the Swamp for brown mushrooms and sugar cane, the Snowy Biome for golden apples and snowballs, and the Underground for gunpowder and spider eyes.
Explore Multiple Biomes
This room features projections on screens on all four walls and the floor, with no physical objects. Here, you collect materials needed for your mission. You start out in the swamp, then the screens transition to a snowy scene, then the underwater biome. Interact with objects on the walls (like cutting sugar cane). They fall to the floor, and you step on them to collect them.
Fight Mobs in the Mineshaft
This room has three interactive screens, on two walls. There is an empty minecart in the middle of the room on one side, and a Spider in a mine cart with tracks leading from it on the other.
Stand on the X blocks in front of the screen to start breaking walls and uncover TNT to blow it up and reveal the mineshaft. Use your Orb as swords to fight Zombies, Creepers, and Skeletons as you progress. You then go down the minecart (on screen) to another level where you fight off Creepers and more Skeletons.
Build a Nether Portal
This room has long glowing blocks on two walls to collect water (turning your orb blue) and lava (turning your orb red). Once you’ve collected the liquid, place your orb on blocks near the entrance to alternate between lava and water and complete the Nether portal sequence.
Trade With Piglins
This smaller room contains a few pigs. Place your orb on each pig to “trade.” Your orb changes color with each trade, and the pigs may snort. This room is simple and quick, with it ending before you’ve really figured out what the point of it was.
Battle Blazes in the Nether
This area starts with an interactive lava floor you play floor-is-lava to get across. Next is a snow fight area with a large screen and bins of snowballs. Throw snowballs at the screen to defeat Ghasts, Blazes, and other mobs until the final Blaze is defeated.
Brew the Potion
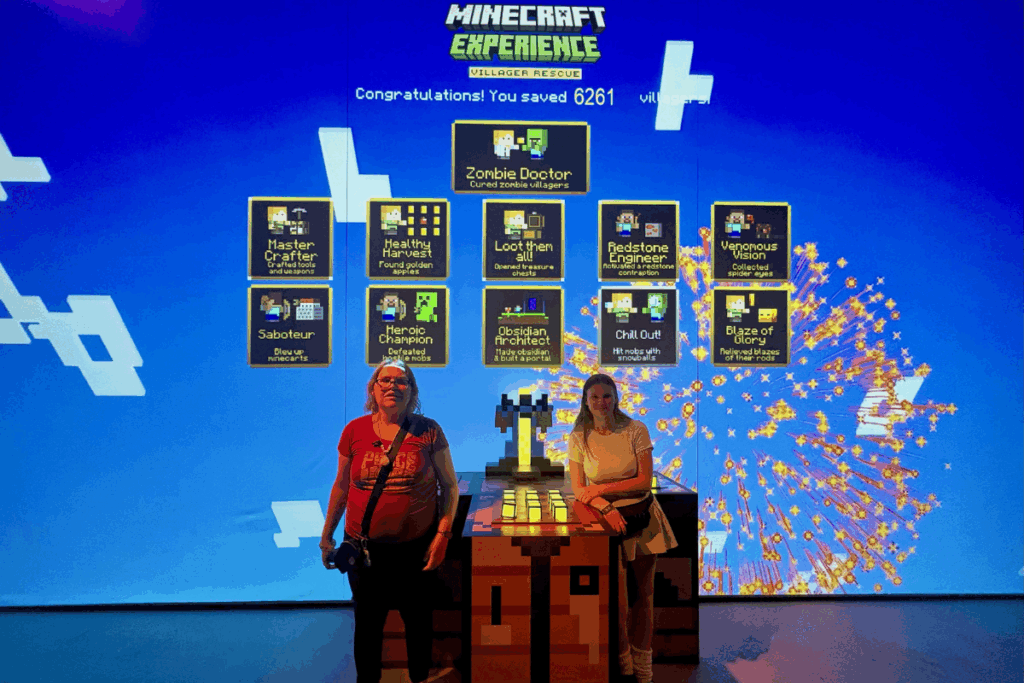
In the final room is a large screen with three blocks with grids in front of it for your orb. Place your orb on the blocks, then stand back and watch the finale of your adventure on the screen. At the end, the screen shows you how many villagers you saved and lists all your achievements.
Trading Post
You exit into the gift shop, full of Minecraft clothing, toys, and souvenirs—perfect for a memento of your adventure.
Our Minecraft Experience: Villager Rescue Review
While neither of my kids is really into Minecraft anymore, they were obsessed when they were younger and both wanted to see the movie when it came out, so I knew this would be something they’d enjoy at least for the nostalgia.
Brie enjoyed every part of the experience with no complaints.
Zen, who is 16, didn’t like that moving between rooms took so long. She was done with each task well before it was time to move on, and would just find a place to sit and wait (as did many parents). Brie, on the other hand, happily repeated tasks until it was time to move on. From what I observed, most children didn’t mind the length wither. Teenagers or adults might get bored, but younger kids seem were engaged.
My main complaint was how crowded it was, which impacts the enjoyment of the experience. Groups of 25 are too large. In several rooms, there were more participants than interactive objects, making it harder to complete tasks. This could be challenging for younger children or kids with disabilities who struggle with waiting (Check out Is the Minecraft Experience Autism Friendly? post for tips if you plan to bring a child with special needs).
In the Craft Tools and Weapons room, it was hard to make a weapon—you see the material you need, but by the time you collect it and go to add it, someone else has already finished, leaving you trying to find another weapon that needs the material you gathered. Despite this, none of the kids seemed to mind, they would just move on to try another one.
The whole experience lasted about an hour, as advertised. If it was not a guided experience, I think older kids and teens/adults would likely go through in about 20 minutes.
At the exit, we visited the gift shop. Brie had her own money and found something she wanted, but since the event is cashless, I had to lend use my debit card. I don’t find this very child-friendly since many kids will have birthday money or other cash to spend, not a card.
Overall, the Minecraft Experience: Villager Rescue is a great interactive event, especially for younger children. Adults and teens who are or were Minecraft fans will likely enjoy it more for the scenery and immersive setting than the game itself.
For more reviews of family-friendly attractions across Southwest Ontario and North America, follow me on Facebook or TikTok. I cover everything from practical travel tips to the best destinations, attractions, and events for families.
You may also like:
- Is the Minecraft Experience Autism Friendly?
- The London Children’s Museum Review
- Big Bounce Canada Review
Find more travel Inspiration:
- Toronto, Ontario Travel Guides and Reviews
- Niagara Falls, Ontario Travel Guides and Reviews
- Ottawa, Ontario Travel Guides and Reviews
- Quebec City Travel Guides and Reviews
- London, Ontario Travel Guides and Reviews
- Michigan, U.S.A. Travel Guides and Reviews
- Ontario Family Travel
- Ontario Events
- Gluten Free Travel Reviews
- East Coast Canada Road Trip Guides
- Disney World Guides